Gas Manifold Replacement For Noritz Tankless Water Heaters
Every Noritz tankless water heater has a gas manifold that controls how much gas enters the burner at any given time. The gas manifold ensures that your unit is using the correct amount of energy to heat incoming water, thereby preventing waste or underperformance.
It’s important then to ensure that the gas manifold operates properly. According to Randy Oshiro, Assistant Manager of Engineering at Noritz, the way to tell if the gas manifold needs changing is if the unit isn’t firing properly. “A malfunctioning gas manifold would bring up a combustion-related 11 or 12 error code on the unit,” he explains.
Learn about resolving the most common error codes on a tankless water heater
The following steps explain how to replace a gas manifold and adjust manifold gas pressures. These steps are meant as an educational overview for your plumbing or HVAC contractor, and Noritz recommends that you not try this yourself unless you are a licensed and trained professional.
Installing the New Manifold

- Remove the water heater’s front cover, using a Philips screwdriver. Turn off the gas valve and unplug the unit.
- Remove the C-clamp on the bottom right-hand corner of the unit and slide the gas pipe up, so it disconnects from the gas inlet fitting.
- Follow the wires protruding from the manifold to the connected wire harness. Disconnect by pressing and holding the middle tab of the harness and pulling apart at the same time.
- Remove the manifold by unscrewing the four screws. (Do not use power tools.) Once inside, separate the gas pipe entirely from the manifold.
- Insert the gas pipe into the new manifold. Push down until it bottoms out.
- Install the new manifold into the unit by inserting the attached gas pipe into the inlet fitting, pushing down until the washer is perfectly resting on top of the fitting. Reinstall the C-clamp and make sure it can rotate with ease.
- Reconnect the wire harness by pushing the two ends back together until you hear a click. Reattach the manifold, using the four main screws.
Adjusting Manifold Gas Pressures
For these next steps, you will need a manometer and a gas manifold chart found here. Adjusting the pressure ensures that the proper amount of gas enters the unit.
- Turn on the gas valve and inspect the unit for any gas leaks before closing the water valve and reconnecting the power to the unit.
- To test the gas pressures, turn on the manometer and wait until it displays 0.00. Then take the manometer tube and attach it to the manifold testing port. Turn the water inlet valve back on and open several faucets to create enough hot-water demand for the manifold adjustment.
- Locate the burner glass window and confirm there is a flame.
- Remove the manometer tube from the manometer and block the end of the tube with your finger. Zero out the manometer and then reattach the tube to purge any residual air.
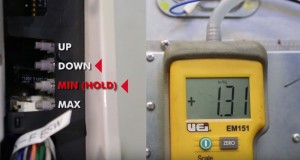
- Locate the manifold pressure adjustment buttons on the circuit board. Press and hold the top and third button from the top until “S_P” pops up, meaning “special unit.” (See image on right for button meanings).
- Use the chart to find the listed minimum and maximum pressures for the unit. Press the minimum and maximum buttons before using the up and down buttons to adjust their respective pressures.
- Turn off the water inlet and gas valves. Remove the tube from the manifold testing port and insert a new pre-coded screw.
- Turn the water inlet and gas valves back on and replace the unit’s front cover.
For a detailed instruction video on manifold replacement and gas pressure adjustment, please view the video below, or contact Noritz at 1-866-766-7489.